Tutorials - QML integration testing
In this tutorial you will learn how to write an integration test to strengthen the quality of your Ubuntu QML application. It builds upon the Currency Converter Tutorial.
Requirements
- Ubuntu 14.04 or later - Get Ubuntu
- The currency converter tutorial - if you haven't already, complete the currency converter tutorial
- The unit testing tutorial for currency converter - if you haven't already, unit testing tutorial
- The QML test runner tool - open a terminal with
Ctrl+Alt+Tand run these commands to install all required packages:
sudo apt-get install qtdeclarative5-dev-tools qtdeclarative5-test-plugin
What are integration tests?
An integration test tests interactions between pieces of your code. It can help ensure that data is passed properly between functions, exceptions are handled properly and passed, etc.
Integration tests are the middle of the testing pyramid. They cover more code at once and at a higher level than unit tests. As you remember, the testing pyramid describes the three levels of testing an application, going from low level tests at the bottom and increasing to high level tests at the top.
In Ubuntu, like unit tests, integration tests for your qml application:
- Are written in JavaScript within an Ubuntu Testcase type
- Are executed with the
qmltestrunnertool, which will determine whether they pass or fail
Again, the qmltestrunner tool allows you to execute QML files as testcases
consisting of test_ functions. We’ll make use of it to run our tests.
Running the example
To help you see what integration tests look like in real life, grab a branch of the currency converter code from the tutorial. Run this command in a terminal:
bzr branch lp:ubuntu-sdk-tutorials
This creates a new folder called ubuntu-sdk-tutorials. The code we'll be
looking at inside the branch is under getting-started/CurrencyConverter. On
the terminal, now switch to the tutorial folder:
cd ubuntu-sdk-tutorials/getting-started/CurrencyConverter
If you navigate to that folder with the file browser, you can click on the
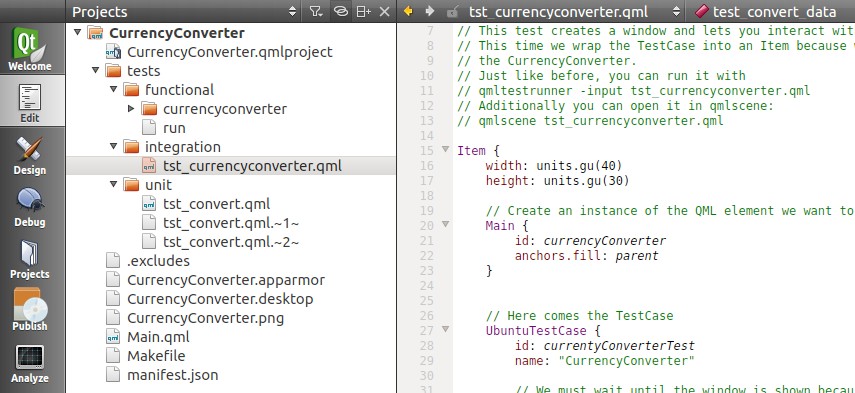
CurrencyConverter.qmlproject file and open it with the Ubuntu SDK IDE:

So let’s run it! Switch back to your terminal and run:
qmltestrunner -input tests/integration
If everything went successfully, you should see a small window appear and disappear quickly and a printout displaying all tests as passing.

Integration tests for Currency Converter
The currency converter application involves inputting data into TextField’s on a Page and pressing a Button. We know from our previous unit test tutorial that the convert function we use to do this operates correctly, so it’s time to test passing data from our TextField’s to the convert function and vice versa.
Now let’s write some tests!
Preparing the testcase
Before we can test these qml components we’ll need to create an instance of
the QML element we want to test. To do this, open the
tst_currencyconverter.qml file. In order to declare an instance of our main
qml window, we’ll need to import our qml files from the root folder. The
import “../..” line imports all of the qml from the root folder ensuring we
can declare a new instance. Our main window is called Main in our application,
so let’s declare a new instance.
import "../.."
...
Item {
    width: units.gu(40)
    height: units.gu(30)
    // Create an instance of the QML element we want to test
    Main {
        id: currencyConverter
        anchors.fill: parent
    }
}
This will create a small (40 by 30 units) instance of our currency converter main window when we execute this QML. We will use this to test.
Simulating mouse and keyboard input
We also need to think about how we will simulate mouse and keyboard input, since we intend to pass data into UI elements. Fortunately, there are useful methods from Qt.TestCase to help us.
The keyPress(), keyRelease(), and keyClick() methods can be used to simulate keyboard events, while mousePress(),[ mouseRelease()] (../api-qml-current/QtTest.TestCase.md#mouseRelease- method), mouseClick(), mouseDoubleClick(), and mouseMove() methods can be used to simulate mouse events.
These useful methods are self-describing and allow us to interact with the active qml element. Before using them however, we must ensure the window has loaded. To do this, we’ll be using the when and windowShown properties.
when: windowShown
Adding this simple check will ensure our test won’t begin until the window has loaded.
Our first testcase
With our test now all ready to launch and wait for our element to load, we can write our test for converting rates. Note again that we simulate the mouse and keyboard as inputs for our test.
function test_convert(data) {
    var inputFrom = findChild(currencyConverter, "inputFrom")
    var inputTo = findChild(currencyConverter, "inputTo")
    // Click in the middle of the inputFrom TextField to focus it
    mouseClick(inputFrom, inputFrom.width / 2, inputFrom.height / 2)
    // Click at the right end of the inputFrom TextField to clear it
    mouseClick(inputFrom, inputFrom.width - units.gu(1), inputFrom.height / 2)
    // Press key from data set
    keyClick(data.inputKey)
    // Now the field should contain the value from the data set
    // compare() also checks the type. We need to convert text to int if the data set holds ints.
    compare(parseInt(inputFrom.text), data.value)
    // The output field should be 0 when the input is 0, otherwise it should be greater than 0
    if (data.value == 0) {
        // Here we compare the text to the string "0"
        compare(inputTo.text, "0", "0 Euros is not 0 Dollars!?!?")
    } else {
        // With verify() automatic casting can happen.
        verify(inputTo.text > 0)
    }
}
This test case will clear the input text field and input values. We then assert to ensure that two things occur. The first is that the text field receives and properly reacts to our input. The second assertion checks if the conversion field is properly updated with a converted value.
Going deeper
Did you notice our test case also has an import of data? This lets us test a
few different values to make sure we have all our edge cases covered. We can
do this by defining _data functions. Examine the following function in the
test case.
function test_convert_data() {
    return [
        { tag: "0", inputKey: Qt.Key_0, value: 0 },
        { tag: "5", inputKey: Qt.Key_5, value: 5 }
    ]
}
This function is named the same as our test_convert function, with an
additional string of _data appended to the end. This instructs qmltestrunner
to run our test_convert function with the given inputs; 1 run for each set of
values.
Another test
There’s an additional test we can code to ensure our input fields behave properly. The clear button is a part of the main window and the text fields should react when it is pressed. Let’s write a testcase to ensure this behaves as expected.
function test_clearButton() {
    var inputFrom = findChild(currencyConverter, "inputFrom")
    var inputTo = findChild(currencyConverter, "inputTo")
    // Click in the middle of the inputFrom TextField to focus it
    mouseClick(inputFrom, inputFrom.width / 2, inputFrom.height / 2)
    // Press Key "5"
    keyClick(Qt.Key_5)
    // Now the field should contain the value 0.05 because 0.0 is already in there in the beginning
    tryCompare(inputFrom, "text", "0.05")
    var clearBtn = findChild(currencyConverter, "clearBtn")
    mouseClick(clearBtn, clearBtn.width / 2, clearBtn.height / 2)
    // Now the field should be set back to "0.0"
    tryCompare(inputFrom, "text", "0.0")
}
In this testcase we utilize the tryCompare function to issue asserts in reaction to our simulation of inputs. This allows for an asynchronous event to occur, as opposed to the compare function which we used above. In other words, our assertion won’t fail immediately, since the inputfield needs some small amount of time to react to the button state.
Notice the multiple assertions as well. If we ever decide the clear button should perform additional functions, we can update this testcase.
Conclusion
You've just learned how to write integrations tests for a form-factor- independent Ubuntu application for the phone. But there is more information to be learned about how to write qml tests. Check out the links below for more documentation and help.
 Ubuntu Phone documentation