Scopes tutorials - write a scope in C+ for JSON data
SoundCloud tutorial
A scope is a tailored view for a set of data, that can use custom layouts, display and branding options. From RSS news feeds to weather data and search engine results, the flexibility of scopes allows you to provide a simple, recognizable and consistent experience with the rest of the OS. Scopes can also integrate with system-wide user accounts (email, social networks…), split your content into categories and aggregate into each others (for example, a “shopping” scope aggregating results from several store scopes).
In this tutorial, you will learn how to write a scope in C+ for SoundCloud, using the Ubuntu SDK. For this example, very limited C+ knowledge is actually required and adapting it to another service exposing a JSON API will be very simple.
Note: This tutorial should work for Ubuntu 14.04 and later versions. If you want to use the scopes layout tool, you will need at least Ubuntu 14.10.
SDK setup
The SDK provides various templates for different types of applications. C+ scopes have their own template, and this is what we are going to use. Hit the “New Project” button to create a new scope project. You will be asked to fill a few values to generate it.
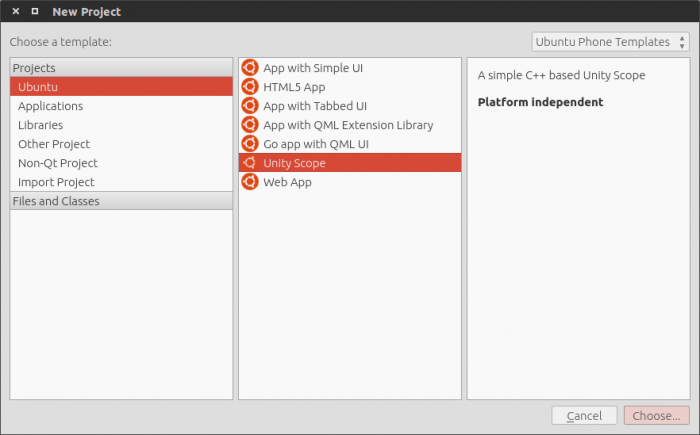
If you need more help to get started with the SDK, have a look at the SDKsetup article.
Note: Even if you are used to the security policies of the platform, there is one more thing you need to know with scopes : if you need to use the network at some point, you won’t be able to access user data. This is a logical privacy policy to avoid user data extraction without explicit consent.
Testing your scope
At any point during this tutorial, you can press the Play button on the sidebar of the SDK to test the scope on your phone or on in anemulator. Wait a few seconds for your project to be built and uploaded to the device, it should then open by itself.
Key source files
You can get the source code of this tutorial by running
$ bzr branch lp:~davidc3/ubuntu-sdk-tutorials/scope-tutorial-soundcloud-qjson
The generated project contains quite a lot of files and we are going to talk about the most important ones. One thing to note is that the template already provides a working scope : a weather scope using openweathermap.org. We are going to change it to pull results from SoundCloud.
manifest.json
Its content will be used by the build system to generate a click package, which you will be able to install and publish on the Ubuntu Store. In most cases you can keep default values that have been pulled from your developer environment.
.apparmor
Security policy groups used by your scopes. None in our case, since the “ubuntu-scope-network” template we are using already allows network calls. Learn more about security policy groups.
data/.ini
A very important file that will allow you to customize and brand your scope (icon, background images, colors…). We will see that in a moment.
include/api/config.h
Our HTTP config: user agent and base API URL. Let’s make our first change by changing the apiroot to the SoundCloud API URL.
std::string apiroot { "https://api.soundcloud.com" };
Other URL parameters will be added later with the net-cpp library.
include/api/client.h, /scope/scope.h, /scope/query.h, /scope/preview.h
The rest of our C+ headers. As seen below, change the client.h header to match the data structure of the SoundCloud API. You can leave the rest of headers as they are.
This is how my Client class now looks like. You can try it by pasting the content of the tutorial file into your own :
class Client { public: /** * Our Artist object. */ struct Artist { unsigned int id; std::string username; std::string avatar_url; }; /** * Track info, including the artist. */ struct Track { unsigned int id; std::string title; std::string uri; std::string artwork_url; std::string stream_url; std::string description; std::string genre; Artist artist; }; /** * A list of Track objects. */ typedef std::deque<Track> TrackList; /** * Track results. */ struct TrackRes { TrackList tracks; }; Client(Config::Ptr config); virtual ~Client() = default; /** * Get the track list for a query */ virtual TrackRes tracks(const std::string &query); /** * Cancel any pending queries (this method can be called from a different thread) */ virtual void cancel(); virtual Config::Ptr config(); protected: void get(const core::net::Uri::Path &path, const core::net::Uri::QueryParameters ¶meters, QJsonDocument &root); /** * Progress callback that allows the query to cancel pending HTTP requests. */ core::net::http::Request::Progress::Next progress_report( const core::net::http::Request::Progress& progress); /** * Hang onto the configuration information */ Config::Ptr config_; /** * Thread-safe cancelled flag */ std::atomic<bool> cancelled_; };
src/api/client.cpp
Our API client. It provides separation between the scope code and the HTTP API access. Its sole purpose is to retrieve data from SoundCloud.
src/scope/scope.cpp
This file defines a class of type unity::scopes::ScopeBase that provides the entry point API the client uses to interact with the scope.
- It implements start and stop methods. Many scopes can leave these unmodified, and this example does as well.
- It also implements two key methods: search and preview. These methods often do not need to be modified and they are not modified in this example. However, they call critical methods that do need to be implemented in every scope, as discussed below.
Note: You may find it useful to check out the ScopeBase class declaration (its API) in the corresponding header file: include/scope/scope.h. The header file is a great way to understand C+ classes because their API is declared without any additional implementation code, making it easy to understand.
Tip: Check out the Unity 8 Scope API reference docs during this tutorial if you want a deeper understanding of specific classes.
src.mdscope/query.cpp
Here is where we send queries to the API client, transform returned results into result cards, declare categories that will host these cards and their layout.
This file defines a class of type unity::scopes::SearchQueryBase.
This class generates search results from a query string a client provides and returns them as a reply to the client:
- Receives the query string from the client
- Receives a reply object from the client
- Sends the query to the API client
- Creates search result categories (for example with different layouts : grid/carousel)
- Combines each search result with its category (creating CategorisedResult objects)
- Pushes categorized results into the reply object for display by the client
Much of the coding work is done in the run method, and our changes here will be minimal.
Check out the SearchQueryBase class declaration (its API) in the corresponding
header file: include/scope/query.h.
src/scope/preview.cpp
This key file defines a class of type unity::scopes::PreviewQueryBase.
This class defines the widgets and layouts used for each search result during the preview phase. It:
- Defines the widgets used in previews
- Maps widget fields to data fields in each result
- Defines layouts with different numbers of columns – known only by the client at display time, depending on the display size.
- Assigns widgets to columns for each layout
- Receives a reply object and pushes the widgets and layouts onto it for use by the client
Check out the SearchPreviewBase class declaration (its API) in the
corresponding header file: include/scope/preview.h.
For a list of Preview Widgets and documentation, see this page.
Let’s drill into our example scope and detail some of the code, starting with the query.
Query string
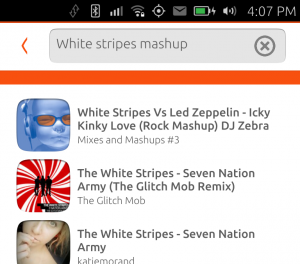
In src/scope/query.cpp, you can easily see where the scope is receiving the user query. When the scope is opened, this query is blank and you will want to provide some data for this case. It’s a good opportunity to surface featured content or latest/popular items.
Here, I’m just triggering a search for the string “blur cover”, to be passed to the API client, because SoundCloud has nice covers of their songs. You will probably want something more elaborated that that, but for the sake of this example, let’s assume it’s a good starting point for our users. Modify the Query::run method so that it looks like this, or simply paste the content of the tutorial file into your own :
void Query::run(sc::SearchReplyProxy const& reply) {

 try {
     // Start by getting information about the query
     const sc::CannedQuery &query(sc::SearchQueryBase::query());

     // Trim the query string of whitespace
     string query_string = alg::trim_copy(query.query_string());

     Client::TrackRes trackslist;

     if (query_string.empty()) {

         // If the string is empty, provide a specific one
         trackslist = client_.tracks("blur cover");

     } else {

         // otherwise, use the query string
         trackslist = client_.tracks(query_string);

     }

(...)
Generating search results
Let’s move on to api/client.cpp to get some results from SoundCloud…
net-cpp is the simple networking library we are going to use to query the API. You can, however, replace it and use any other networking library to suit your purposes. The template already provides a get method using net-cpp to handle HTTP headers and errors, parse the response and return a JSON object, which comes handy and will do the job for most JSON APIs. Try it by simply pasting the content of the tutorial file into your own, or follow these steps.
The base URI is pulled from our config header, we just need to add the rest of our path and parameters :
get( { "tracks.json"}, { { "client_id", "apigee" }, { "q", query } }, root);
// https://api.soundcloud.com/tracks.json?client_id=apigee&q=<query>
Note: About client_id: if you wish to distribute a SoundCloud scope, you will need to register your own API key at SoundCloud Developers (it’s free and takes 5 minutes). In the above sample, I’m using their example key.
Then, we need to iterate over each result present in our root JSON object and extract what we need. Here is our complete method:
Client::TrackRes Client::tracks(const string& query) {

 QJsonDocument root;

 // Build a URI and get the contents.
 // The fist parameter forms the path part of the URI.
 // The second parameter forms the CGI parameters.
 get( { "tracks.json"}, { { "client_id", "apigee" }, { "q", query } }, root);

 // https://api.soundcloud.com/tracks.json?client_id=apigee&q=<query>
 // My “list of tracks” object (as seen in the corresponding header file)

 TrackRes result;

 QVariantList variant = root.toVariant().toList();

 for (const QVariant &i : variant) {

     QVariantMap item = i.toMap();
     QVariantMap user = item["user"].toMap();
     string art;

     // If the track artwork is empty, we use the artist picture
     if (item["artwork_url"].toString().toStdString() == "") {
         art = user["avatar_url"].toString().toStdString();
     } else {
         art = item["artwork_url"].toString().toStdString();
     }

     cout << item["title"].toString().toStdString();

     // We add each result to our list
     result.tracks.emplace_back(

         Track {
             item["id"].toUInt(), item["title"].toString().toStdString(),
             item["uri"].toString().toStdString(), art,
             item["stream_url"].toString().toStdString(),
             item["description"].toString().toStdString(),
             item["genre"].toString().toStdString(),

             Artist {
                 user["id"].toUInt(),
                 user["username"].toString().toStdString(),
                 user["avatar_url"].toString().toStdString()
             }
         }
     );
 }

 return result;
}
That’s it. We have the data we need and are going to see how to display it the way we want.
Category renderers
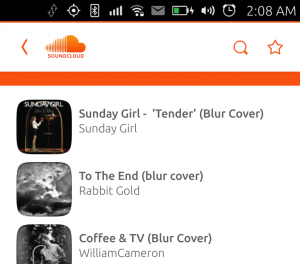
Each result needs to be displayed inside a category. In terms of UI, a category can provide a header title to a list of results and a specific layout for both the way results are positioned and the way they look. Try it by pasting the content of the tutorial file into your own, or follow these steps.
CategoryRenderers are created from JSON objects. These are created as raw strings. The JSON objects have two fields of immediate interest: template and components.
Modify the categories on src/scope/query.cpp to resemble this:
const static string TRACKS_TEMPLATE =

 R"(
     {
         "schema-version": 1,
         "template": {
         "category-layout": "grid",
         "card-layout": "horizontal",
         "card-size": "large"
     },

     "components": {

         "title": "title",
         "art" : {
             "field": "art"
         },

         "subtitle": "artist"
        }
     }
 )";
This will display a simple list of results, it’s a category style used in many scopes, working well with many types of content. You can have a look at all your options in the unity::scopes::CategoryRenderer doc.
Now, in the try{} part of the Query::run method, we can register our category
on the reply object :
// Register a category for tracks
auto tracks_cat = reply->register_category("tracks", "", "",
    sc::CategoryRenderer(TRACKS_TEMPLATE));

// register_category(arbitrary category id, header title, header icon, template)
// In this case, since this is the only category used by our scope,
// it doesn’t need to display a header title, we leave it as a blank string.
Results
For this SoundCloud scope to be useful, we want each result to have at least:
- a URI : the link to the track page (required)
- a category : as seen above, it determines where and how the result is displayed in the UI (required)
- a title : the name of the track
- an artist : the name of the band/artist
- a visual : the album/track cover
Make sure every fields you have defined in your category template components are presents in results, even if they are empty. Invalid results will be automatically discarded.
Still in src/scope/query.cpp, in the try{} part of our Query::run method, we need to iterate over our tracks list, and create a unity::scope::CategorisedResult for each. Paste the content of the tutorial file into your own, or reproduce the following lines :
for (const auto &;track : trackslist.tracks) {

     // Use the tracks category
     sc::CategorisedResult res(tracks_cat);

     // We must have a URI
     res.set_uri(track.uri);

     // Our result also needs a track title
     res.set_title(track.title);

     // Set the rest of the attributes, art, artist, etc.
     res.set_art(track.artwork_url);
     res["artist"] = track.artist.username;
     res["stream"] = track.stream_url;

     // Push the result
     if (!reply->push(res)) {

         // If we fail to push, it means the query has been cancelled.
         return;

     }
}
As you can see, you can use specific methods for some fields (set_art, set_uri…) and can also add custom fields (artist, stream, duration…).
Previews
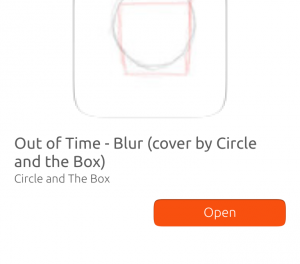
The preview needs to generate widgets and connect their fields to the data
fields in the CategorisedResult.
It also should generate layouts to handle different display environments. The idea is that only the client knows the layout context. The client thinks of the display context it in terms of the number columns available. The scope defines which columns to put widgets into for layouts with different numbers of columns.
First, let’s take a look at widgets.
Preview Widgets
There is a set of predefined Preview Widgets. Each has a type field you use to create them. Each type of widget also has additional fields that vary by widget type.
You can see the the list of Preview Widget types and the fields they offer here.
This example uses three types of Preview Widgets:
- header: has a title and a subtitle field
- image: has a source field used to retrieve the art from
- actions: used to provide button text “Open” and the URI opened when the user clicks the preview
Here’s how our example creates a header widget named w_header on the
Preview::run method of
src/scope/preview.cpp:
sc::PreviewWidget w_header("headerId", "header");
- The first parameter is an arbitrary ID. We use these IDs to assign the widget to different layouts, as shown later.
- The second parameter is the Preview Widget type, one of the set of pre-defined types.
After widget creation, the widget fields are populated with data from the
CategorisedResult being processed by the client. Our w_header widget’s
standard fields: title and subtitle are populated.
Two methods are available to put data into widget fields:
add_attribute_value(FIELD, VALUE): You can use this method to simply populate data you have on hand into the widget fieldadd_attribute_mapping(FIELD, CR_FIELD): Use this method to populate data from theCategorisedResultbeing processed into the widget field.
In our example, widget data is derived from the current CategorisedResult, and
so add_attribute_mapping is used.
First, let’s map the w_header widget’s title field (the first parameter) to
the title field in the current CategorisedResult (the second parameter):
w_header.add_attribute_mapping("title", "title");
The next example is a little more interesting because we populate a widget
field from a CategorisedResult field that is not part of the CategoryRenderer.
The field is artist. We added the artist key and value directly to our
CategorisedResult for each result previously. So this example shows how to
display data in your preview even when the data is not displayed in results
phase and is custom to the scope:
w_header.add_attribute_mapping("subtitle", "artist");
Looking back at the query, where the CategorisedResults were created, we see
again how the artist data was made available to the CategorisedResult:
res["artist"] = track.artist.username;
As a result of that, each CategorisedResult has an “artist” field populated
from the search result. And in this preview phase, we push that artist data
into the w_header widget’s predefined subtitle field.
The content of the tutorial file can be pasted into your own to try these widgets.
Here is the result of our changes :
// Define the header section
sc::PreviewWidget w_header("headerId", "header");

// It has title and a subtitle properties
w_header.add_attribute_mapping("title", "title");
w_header.add_attribute_mapping("subtitle", "artist");

// Define the image section
sc::PreviewWidget w_art("imageId", "image");

// It has a single source property, mapped to the result's art property
w_art.add_attribute_mapping("source", "art");

// Define the actions section
sc::PreviewWidget w_actions("actionsId", "actions");

// Actions are built using tuples with an id, a label and a URI
sc::VariantBuilder builder;

builder.add_tuple({

    {"id", sc::Variant("open")},
    {"label", sc::Variant("Open")},
    {"uri", result["uri"]}

});

w_actions.add_attribute_value("actions", builder.end());
And now they can be pushed to the client with the reply object:
reply->push( { w_art, w_header, w_actions });
The widgets are created, populated, and pushed. But, the client also needs to know where to put the widgets, and even how to arrange the widgets nicely in different contexts, for example a narrow screen and a wide screen, so let’s take a look at layouts.
Generating Layouts
Our example defines two layouts: one with a single column and one with two. These are declared like this:
sc::ColumnLayout layout1col(1), layout2col(2);
Tip: Check out ColumnLayout docs here.
We do not need to know exactly how the client uses these. But the general expectation is that a single-column layout is appropriate for narrow-screen situations (like portrait mode) and a two-column layout may be appropriate for wide screen situations (like landscape mode).
Now, as you can see in the tutorial file src/scope/preview.cpp, we need to define where our three widgets are going to go in each of these layouts.
Naturally, in a single-column layout, all widgets have to go into that single column:
layout1col.add_column( { "imageId", "headerId", "actionsId"});
In the two-column layout, we decide to add the image to the first column, the header and actions to the second column:
layout2col.add_column( { "imageId" });
layout2col.add_column( { "headerId", "actionsId" });
Now, we need to register the layouts into the reply object, as follows:
reply->;register_layout({layout1col, layout2col});
Customization and branding
By default, your scope looks like this :
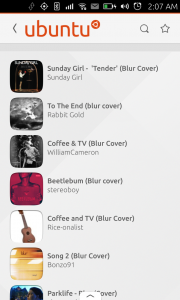
Many display options can be changed in data/<appid>.ini. Here is my best
effort at branding this scope, most of the options are self-explicit :
[ScopeConfig]
DisplayName = SoundCloud
Description = This is a SoundCloud scope doing SoundCloud things
Art = screenshot.png
Author = Firstname Lastname
Icon = icon.png

[Appearance]
PageHeader.Logo = logo.png
PageHeader.background = color://.md#FFFFFF
PageHeader.ForegroundColor = #F8500F
BackgroundColor = #FFFFFF
PageHeader.DividerColor = #F8500F
PreviewButtonColor = #F8500F
I’ve also found this SoundCloudlogo to replace the one provided by the template. Download it and save it as data/logo.png.
If you tweak the category layout and colors, you can get very different styles. The one on the left is the result of using the above snippet :
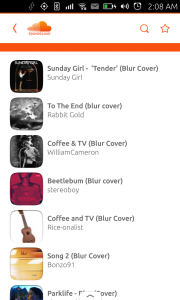
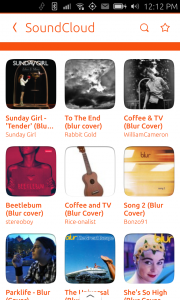
Have a look at all the available customization options and try to make your scope shine!
That’s it, our SoundCloud scope is finished. You can launch it by pressing the Start button in the SDK sidebar, see if everything compiles and starts correctly at the bottom of the editor, and try your new scope!
Summary
- We have seen how to make a scope that queries a web API
- Query results are put into one category with a unique renderer
- The client displays search results
- For the preview phase, four predefined widget types were used
- Multiple layouts were created in which widgets were allocated differently to look good on several form factors
- Some custom data appropriate only for this scope (ex. artist) is displayed in the preview and in results
Going further
Scopes are powerful tools to help the user accessing information and selected content. Ubuntu provides a lot of scopes by default, but there is always room for more !
My favorite source of fresh APIs (for books, movies, etc.) to turn into scopes is the ProgrammableWeb API directory, but there are many others sources. Feel free to experiment with different layouts and cards to accommodate different types of data !
Publishing a scope is exactly like publishing other apps, have a look at our publishing guides to get your scope on the store in minutes.
 Ubuntu Phone documentation